



Table of Contents
- What You'll Need Before You Start
- Why Charging Cables Fray at the Connector
- Step 1: Stop Bending Cables at Sharp Angles
- Step 2: Add Strain Relief With Springs and Tubing
- Step 3: How to Fix a Frayed Charging Cable Safely
- Step 4: Cable Management Tips for Car Charging Setups
- Step 5: Best Cable Protectors for iPhone and Android Phones
- When to Replace a Damaged Cable Instead of Repairing It
- Preventative Maintenance Habits That Extend Cable Life
- Frequently Asked Questions
Last Updated: September 12, 2026
What You'll Need Before You Start
Charging cable fraying almost always starts in the same spot: the few centimeters where the cord meets the connector. Fixing that weak point before it splits takes about ten minutes and a handful of inexpensive items. This guide from CarNook Co. walks through each step, from strain relief to safe repair and smarter storage.
Gather these before you begin:
- Electrical tape or silicone self-fusing tape
- Heat-shrink tubing sized to your cable diameter
- A small spring from a retired pen
- Scissors or wire cutters
- A heat source (hair dryer or heat gun on low)
- Cable clips, ties, or a protective sleeve
A common mistake is buying supplies after the damage appears. Keeping a small repair kit in your glovebox means a frayed cable never leaves you scrambling for a charge on the road.
Why Charging Cables Fray at the Connector
Fraying happens because the connector is rigid while the cable jacket is flexible. Every bend concentrates stress at that junction, and over hundreds of plug-in cycles the insulation weakens and splits. The copper strands inside then flex until they break.
Two design details make some cables more vulnerable than others. Thermoplastic polyurethane (TPU) jackets resist repeated bending better than stiff PVC, and braided nylon outer layers spread tension across a wider surface. Cheaper cables often skip both, which is why they fail within months.
The failure is rarely sudden. Most cables show warning signs first: a slight bulge near the connector, a stiff spot, or a faint crack in the jacket. Catching those early is the difference between a two-minute fix and a dead cable.
Step 1: Stop Bending Cables at Sharp Angles
The single most effective habit is changing how you hold and route the cable. Sharp bends under 90 degrees put maximum tension on the connector, and that tension is what starts fraying in the first place.
Try these adjustments:
- Hold the connector head, not the cord, when unplugging.
- Leave a gentle loop of slack near the phone instead of pulling the cable taut.
- Route cords around obstacles rather than folding them tight.
- Avoid resting the phone on the cable while it charges.
A cable that stays relaxed at the connector can outlast one that gets yanked daily by a wide margin. This is the cheapest fix available because it costs nothing but attention.
Step 2: Add Strain Relief With Springs and Tubing
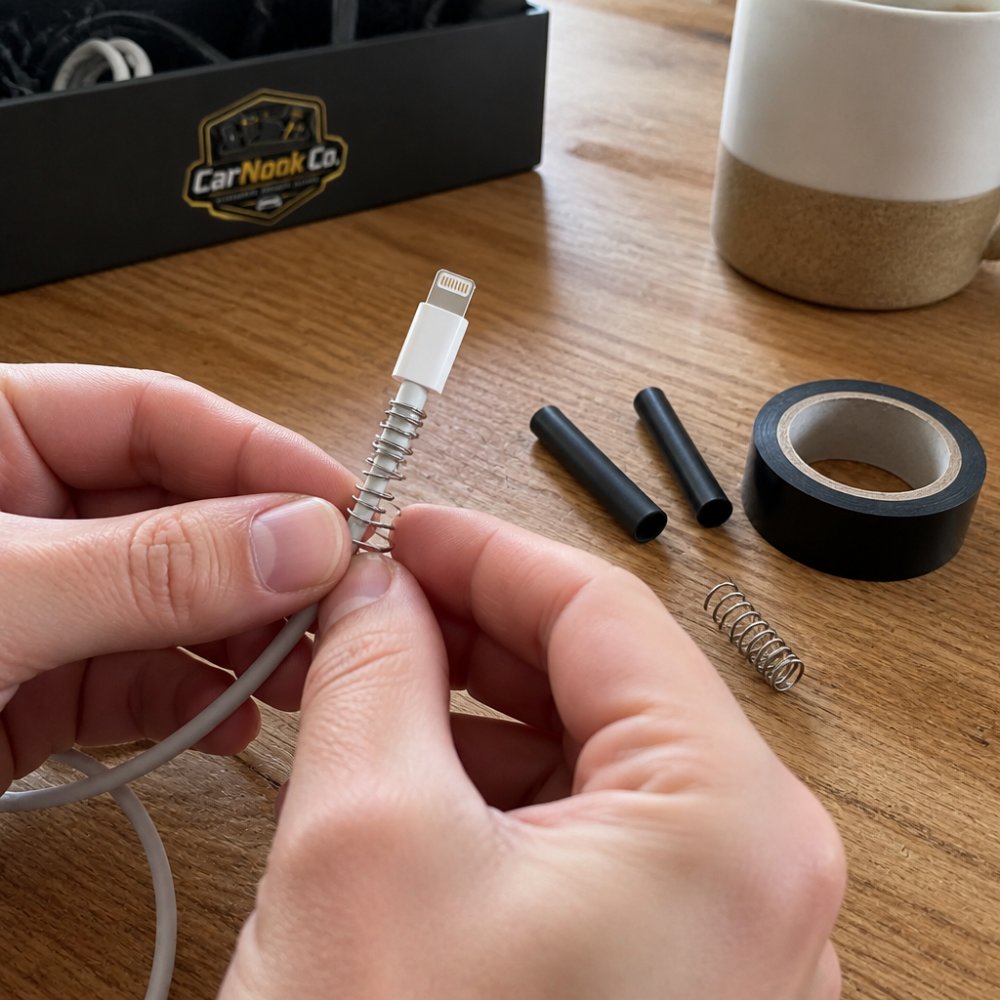
Strain relief is any material that absorbs bending before it reaches the connector. Two household items handle this well: a pen spring and a length of heat-shrink tubing. But which one you reach for should depend on what your cable jacket is made of, because heat and compression affect each material differently.
Match the Method to the Jacket Material
Most charging cables use one of three outer constructions, and each one fails and responds to repair differently:
- TPE (thermoplastic elastomer): The soft, matte rubber feel common on cables that ship with phones. TPE flexes easily but tears at the connector because it has low resistance to repeated bending. It also softens at relatively low heat, so a heat gun on high can melt or gloss the jacket. Use a hair dryer on low and keep the nozzle moving.
- PVC (polyvinyl chloride): The stiffer, slightly shiny plastic on many budget cables. PVC resists heat better than TPE but cracks rather than flexes, so it fails suddenly instead of gradually. Heat-shrink works well here because the jacket won't deform under the same warmth.
- Braided nylon over a core jacket: The woven outer layer spreads tension across a wider surface, which is why braided cables usually outlast smooth ones. The trade-off is that the nylon frays into threads once the weave is compromised, and heat-shrink grips the braid poorly. A coiled spring or a silicone sleeve that wraps the whole bend zone holds better than tubing on braided cables.
If you are not sure which material you have, bend the cable gently near the connector. TPE feels rubbery and springs back; PVC feels rigid and holds a crease; braided nylon shows a visible weave.
Spring Method
- Stretch a pen spring so it covers the first 2 to 3 centimeters of cable behind the connector.
- Slide it over the cord and let it sit snug against the plug housing.
- Wrap electrical tape over both ends of the spring to lock it in place.
Springs work best on TPE and braided cables because the coil flexes with the jacket instead of stiffening it. On a stiff PVC cable, a tight spring can actually concentrate stress at its edges, so leave a little slack at each end.
Heat-Shrink Tubing Method
Cut a piece about 4 centimeters long, slide it over the connector junction, and warm it until it shrinks tight around the cable. The tubing creates a flexible sleeve that spreads bending force along its length instead of concentrating it at one point.
Heat-shrink is the strongest option for PVC and the weakest for braided nylon, because the tubing cannot grip a woven surface and tends to slide. For braided cables, choose a length that overlaps the connector housing by a few millimeters so friction holds it in place.
A cable that stays relaxed at the connector can outlast one that gets yanked daily by a wide margin, and matching the relief method to the jacket material is what makes that margin hold up.
Step 3: How to Fix a Frayed Charging Cable Safely
A frayed charging cable can sometimes be repaired, but only when the damage is limited to the outer jacket. If copper strands are broken or the cable cuts in and out, repair is not worth the risk. The reason is simple physics: a damaged jacket lets the conductor flex, and a flexing conductor has less metal carrying the same current, which raises resistance and generates heat right at the weak point.
Why Fast Charging Changes the Math
A standard 5-watt charger pushes roughly 1 amp through a cable. A modern fast charger can push 3 to 5 amps or more through the same thin conductors. More current through a partially broken strand means more heat, and heat is what turns a taped patch into a fire risk.
A common pattern is a cable that works fine on a laptop USB port but gets warm near the connector when plugged into a fast wall charger or a car's 12V outlet. That warmth is the cable telling you the repair is not holding. If a patched cable gets noticeably warm, stop using it, do not add more tape.
What Tape and Tubing Can and Cannot Do
Electrical tape and heat-shrink restore the outer jacket. They do not restore broken copper. That distinction matters:
- Tape and tubing are safe when the copper is fully intact and only the outer insulation has split.
- Tape and tubing are unsafe when any copper is visible, when the cable only charges at certain angles, or when the connector housing itself is cracked. In those cases the repair is cosmetic and the electrical fault remains.
Safe Repair Steps for Minor Jacket Damage
- Unplug the cable from both the phone and the power source.
- Inspect the split under bright light. If you see bare copper, stop and replace the cable.
- Wrap electrical tape tightly around the split, overlapping each turn by half.
- Cover the taped section with heat-shrink tubing for a second layer.
- Test the cable on a low-power device first, a laptop USB port or a 5W brick, and feel the patch after a few minutes. If it is warm, retire the cable.
The Short-Circuit Mechanism
Damaged insulation allows the positive and negative conductors inside the cable to touch. When they do, current takes the shortest path instead of flowing to the phone, which can spark at the point of contact. Near a car's 12V outlet or a wall charger, that spark has a fuel source and an oxygen supply. This is why a cable with exposed wires should be retired rather than patched, no matter how well the tape holds.
If the cable carries a fast-charging voltage, replace it rather than repair it. A new cable is a small cost next to the risk of a short near your phone, your car's interior, or your hand.
Step 4: Cable Management Tips for Car Charging Setups
A car is the hardest environment for any charging cable. Heat, vibration, and constant plugging wear down a cable jacket faster than a desk setup ever will. Good cable management tips for car use start with reducing movement.
- Use adhesive cable clips to anchor the cord along the dashboard edge.
- Leave a service loop near the phone mount so the connector never pulls tight.
- Store unused cables in a pouch rather than a tangle in the console.
- Keep a spare cable in the glovebox for emergencies.
CarNook Co. carries travel accessories and device organization products designed for exactly this kind of setup, so cords stay put instead of sliding around the console. A little structure goes a long way toward protecting the cable jacket.
Step 5: Best Cable Protectors for iPhone and Android Phones
Cable protectors are small sleeves or molded covers that sit over the connector junction. They work on the same principle as strain relief, spreading tension so the jacket does not split. The best cable protectors for iPhone and Android phones share three traits: flexible material, a snug fit, and coverage of the full bend zone.
| Protector Type | Material | Best For | Reusable |
|---|---|---|---|
| Coiled spring sleeve | Metal | Desk and nightstand cables | Yes |
| Heat-shrink tubing | Polyolefin | Permanent fixes | No |
| Silicone protector | Silicone | Car and travel cables | Yes |
| Braided sleeve | Nylon | Long cables, high traffic | Yes |
Silicone and TPU protectors tend to last longest because they flex with the cable instead of fighting it. The CarNook™ CableGuard Charger Protector uses flexible TPU to cover the vulnerable bend point while adding a bit of color to a plain white cord. It fits standard charging cables and installs in seconds.

When to Replace a Damaged Cable Instead of Repairing It
Replacement beats repair in three situations: broken internal wires, damage near the connector housing itself, and any cable that gets hot while charging. Those problems sit inside the jacket where tape and tubing cannot reach.
Watch for these replacement signals:
- The cable only charges when wiggled into a certain position.
- The connector feels loose or wobbly in the port.
- The jacket is split all the way through to the copper.
- Charging speed has dropped noticeably.
A cable that fails any of these tests is a safety hazard, not a project. Retiring it protects both the phone and the person handling it. Once a replacement is in hand, apply a protector immediately so the new cable never reaches the fraying stage.
Preventative Maintenance Habits That Extend Cable Life
Cable longevity comes down to routine, not luck. A few habits repeated daily will keep a charging cable working far longer than average.
- Unplug by the connector head, never by the cord.
- Coil cables loosely in a figure-eight rather than wrapping them around a hand.
- Keep cables out of direct sun and away from hot dashboards.
- Wipe connectors clean of lint and dust every few weeks.
- Rotate between two cables so neither takes all the wear.
There is an environmental angle here too. Charging cables are a steady contributor to e-waste, and most contain a mix of copper, plastic, and sometimes PVC that is difficult to recycle. Extending a cable's life by a year or more keeps that material out of a landfill and saves money at the same time.
Frequently Asked Questions
How do I protect my charging cable from fraying at the connector?
The connector is where most cables fail because that's where bending stress concentrates. Add strain relief by wrapping a spring, heat-shrink tubing, or a flexible protector around the joint. Avoid pulling the cable by the cord when unplugging. Instead, grip the connector head. Keep cables away from sharp desk edges and car seat rails. These habits reduce the tension that causes the cable jacket to crack and expose wires.
Do charging cable protectors really work to prevent fraying?
Yes, when they cover the weak point where the cable meets the connector. A protector made from flexible TPU or silicone absorbs repeated bending that would otherwise crack the insulation. The CarNook CableGuard Charger Protector, for example, fits around that vulnerable joint to reduce everyday twisting and wear. Protectors work best as prevention. If the cable jacket is already split and wires are visible, replace the cable instead of covering the damage.
Can you fix a frayed charging cable safely, or should you replace it?
If only the outer jacket is scuffed and no wires are exposed, you can reinforce it with heat-shrink tubing or electrical tape. But if you see bare copper, exposed wires, or the cable feels hot during charging, stop using it. A damaged cable can short circuit, damage your phone's charging port, or create a fire risk. Replacement is the safer choice once internal wires are visible.
How should I store charging cables in my car to avoid damage?
Coil cables loosely at a diameter of at least 3 to 4 inches. Never wrap them tightly around a phone, charger brick, or your hand. Use a cable clip, pouch, or organizer to keep them from tangling with keys or sliding under seats. Keep cables out of direct sunlight and away from sharp edges on the center console. Loose coiling prevents the kinks that lead to fraying over time.
Frayed cables are a small annoyance that turns into a dead phone at the worst moment, usually mid-commute with no charger in reach. CarNook Co. builds accessories that head off that problem before it starts, from the flexible TPU CarNook™ CableGuard Charger Protector to car phone mounts and travel accessories that keep cords organized and secure. Explore the CarNook Co. collection and give every cable in the car a longer, safer life.