



Table of Contents
- Why Phone Cables Turn Your Car Into a Mess
- What You'll Need to Organize Phone Cables in Car
- Step 1: Choose the Right Cable Length
- Step 2: Map Your Cable Routing Path
- Step 3: Secure Cables with Adhesive Clips
- Step 4: How to Hide Charging Wires in Car Interiors
- Step 5: Bundle and Protect Your Charging Cords
- Step 6: Label Cables for Quick Identification
- Step 7: Maintain Your Setup for the Long Haul
- Frequently Asked Questions
Last Updated: September 4, 2026
Why Phone Cables Turn Your Car Into a Mess
A loose charging cable rolling around the cabin is one of the most persistent sources of clutter in any vehicle. The problem usually starts small, a single cord draped across the center console, then grows into a tangled nest of USB cables, velcro wraps, and forgotten adapters that collects dust in every crevice. Learning how to organize phone cables in car interiors comes down to a few deliberate choices about length, routing, and retention.
The core issue is that most drivers treat the cable as an afterthought. They plug in, drop the phone in a cup holder, and let the excess cord pile up on the seat. Over time, that slack creates tangles, stresses the charging port, and makes the vehicle interior feel chaotic before the drive even starts. This guide from CarNook Co. breaks down a practical, step-by-step system for cord management that keeps the cabin clean and your charger protected.
Below, the seven steps cover everything from selecting the right cable length to hiding wires along the interior trim. The result is a tangle-free setup that looks intentional, survives summer heat, and keeps your charging cords within easy reach.
What You'll Need to Organize Phone Cables in Car
Before starting, gather the few supplies that make cable management straightforward. Most are inexpensive and available at any automotive or electronics retailer. The goal is to build a small kit you can keep in the glovebox for future adjustments.
- Adhesive cable clips with a heat-resistant adhesive backing
- Cable ties or velcro wraps for bundling excess length
- A cable sleeve or spiral wrap for the main charging cord
- Cable labels or small colored tags
- Isopropyl alcohol wipes and a microfiber cloth for surface prep
- A cable length that actually fits your car and phone position
The most common mistake is buying generic adhesive clips without checking the temperature rating. Vehicle interiors can get extremely hot in summer, and a standard adhesive will soften, letting your cable drop onto the floor mid-drive. Consumer Reports guidance on car interior heat notes that dashboard temperatures can climb well beyond outdoor readings, which makes heat-resistant adhesive a necessity rather than a luxury.
Step 1: Choose the Right Cable Length
Cable length optimization is the single most effective way to reduce clutter before you attach anything. Most drivers use a cable that is far longer than needed, and that extra length becomes the tangle you fight every morning.
Measure the distance from your car's USB port or power outlet to where your phone will sit in its mount. Add about six inches of slack for movement, then buy a cable that matches that measurement. A 1-foot or 2-foot cable often works perfectly for a phone mounted on the dashboard, while a 3-foot cable suits center console setups.
If you already own longer cables, bundle the excess rather than letting it drape. Use a velcro wrap to coil the spare length near the port, keeping the visible portion of the cord clean and taut. This approach prevents cable slack from piling up on the passenger seat or falling into the gear shift area.
Many drivers find that carrying one short cable for the car and a separate longer one for home use eliminates the daily frustration of untangling a cord that never fit the space to begin with.
Step 2: Map Your Cable Routing Path
Cable routing is the difference between a cord that looks like an afterthought and one that disappears into the vehicle interior. Before sticking anything down, trace the path your cable will take from the power source to the phone mount.
The ideal routing path keeps the cable out of reach of shifting gears, sliding seats, and passenger feet. Common routes include tucking the cord along the edge of the center console, running it under the dashboard lip, or following the seam where the windshield meets the dash. For rear-seat passengers, routing along the door sill and up the interior trim keeps the cord out of the walkway.
A common mistake is routing the cable across the front of the dashboard where it blocks your view or reflects in the windshield. Instead, run the cable along the back edge of the console and bring it up near the mount. This keeps the cord out of your peripheral vision and reduces the visual clutter that makes a cabin feel messy.
Use your finger to press the cable along the proposed path before securing it. If the cord pops out of place or bends at an awkward angle, adjust the route. The path should be smooth, with no sharp bends that stress the cable over time.
Step 3: Secure Cables with Adhesive Clips
Adhesive clips are the workhorses of car cable management, but their success depends entirely on surface preparation. A clip stuck to a dusty or greasy dashboard will fail within days, taking your neatly routed cable with it.
Start by cleaning the installation surface with an isopropyl alcohol wipe. Let it dry completely. This removes the oils and residue that prevent the adhesive from bonding. Press the clip firmly into place and hold it for about thirty seconds. For best results, let the adhesive cure for a few hours before snapping the cable in, especially in cooler weather.
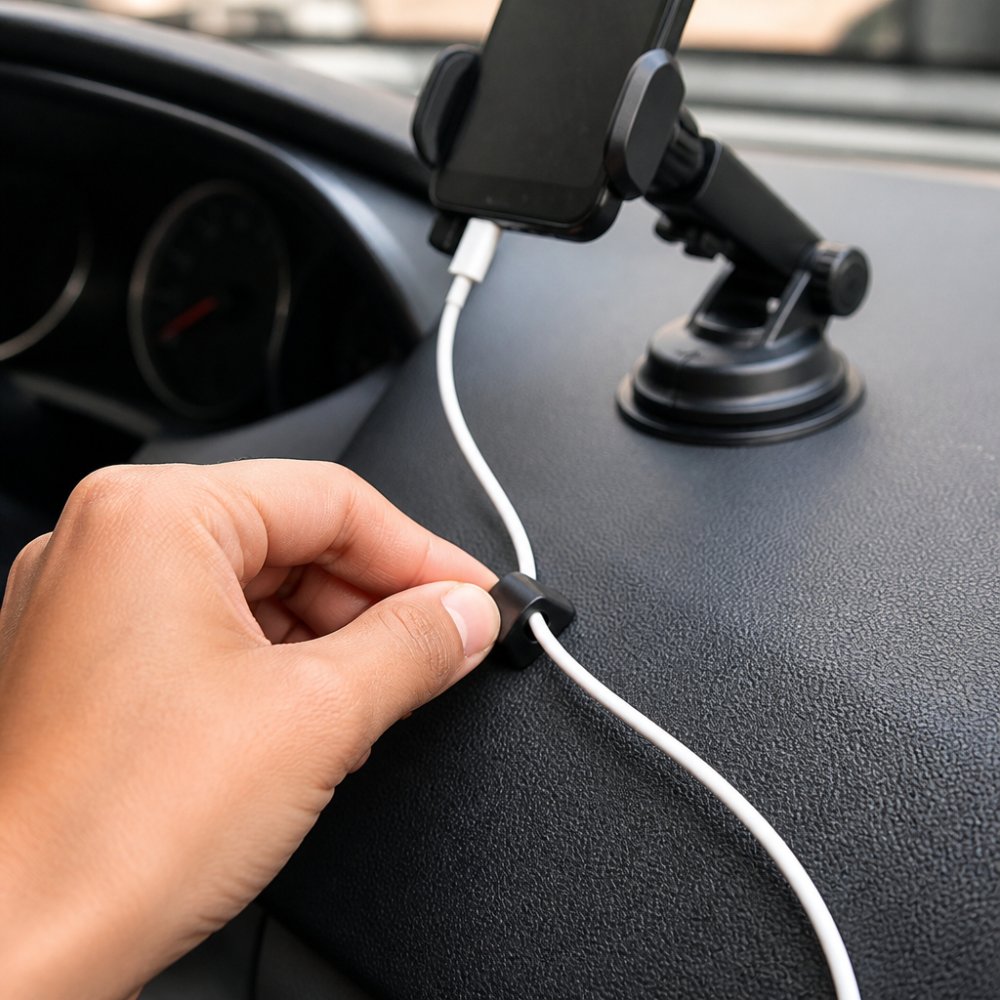
Space the clips about every six to eight inches along the routing path. This prevents the cable from sagging between clips and keeps it from catching on your hand when you reach for the gear shift. Place clips at every point where the cable changes direction to maintain a clean line.
For surfaces that see heavy sun exposure, choose clips rated for high temperatures. Standard plastic clips can warp, and weak adhesives leave a sticky residue behind when they fail. A little extra attention to the adhesive quality saves you from redoing the job in a few months.
Step 4: How to Hide Charging Wires in Car Interiors
Hiding charging wires in car interiors requires working with the vehicle's existing trim rather than against it. Most cars have small gaps between the dashboard and the windshield, or between the center console panels, where a thin cable can be tucked out of sight.
For a dashboard setup, press the cable into the gap where the dash meets the windshield using a plastic trim tool or your fingernail. This conceals the cord along its entire length, leaving only a short exposed section near the phone mount. The result looks factory-installed rather than added on.
Center console cables can be routed underneath the console itself. Lift the edge of the trim panel slightly and tuck the cable beneath it, then route the cord up near the cup holders. This works well for drivers who charge their phone in a mount attached to the air vent or dashboard.
Wire concealment along the interior trim is the method of choice for rear-seat charging. Run the cable from the rear port, tuck it under the seat trim, and bring it out at the seatback. This keeps the cord off the floor where it can be kicked or caught in the seat tracks.
Step 5: Bundle and Protect Your Charging Cords
Once the main cable is routed, address the remaining loose cords and the vulnerable ends of your charging setup. Cable ties and velcro wraps keep spare cords coiled and stored, while a protective sleeve guards the point where the cable meets the connector, the spot most prone to bending and wear.
The junction between the cable and the plug takes constant abuse. Every time you plug and unplug your phone, that joint flexes. Over time, the internal wires fatigue and the cable stops charging reliably. A flexible protector that wraps around this stress point extends the life of the cord significantly.
The CarNook™ CableGuard Charger Protector is designed for exactly this purpose. The flexible TPU material fits around the vulnerable end of your charging cable, helping reduce everyday bending, twisting, and wear while adding a bit of personality to your setup. It is a small addition that keeps your cords working longer, which means fewer replacements and less waste. CarNook CableGuard Charger Protector

For the cables you keep in the car as spares, bundle them with velcro wraps and store them in the glovebox or under the seat. Label each bundle so you can grab the right cord without unrolling every one.
Step 6: Label Cables for Quick Identification
Cable labeling solves a specific problem: knowing which cord belongs to which device without tracing it end to end. In a car shared by multiple drivers, or one where you charge both a phone and a tablet, labels save time and prevent the frustration of unplugging the wrong device.
Use small adhesive tags or colored heat-shrink labels near both ends of each cable. Write the device name directly on the tag, or use a color code that matches a note in your glovebox. A simple system, such as red for the driver's phone and blue for the passenger's, takes minutes to set up and eliminates guesswork.
Labels also help when you carry cables between the car, home, and office. A quick glance tells you which cord is which, so you never pack the wrong one for a road trip. For a minimalist car interior, choose small, neutral-colored labels that blend with the cabin rather than adding visual noise.
Step 7: Maintain Your Setup for the Long Haul
Cable management is not a one-time project. A quick monthly check keeps your setup clean and prevents small issues from becoming frustrating problems. Inspect the clips for signs of adhesive failure, especially after a hot summer, and resecure any that have started to lift.
Check the cable itself for fraying, kinks, or exposed wire. A damaged charging cord is both a fire risk and a charging reliability issue. Replace any cable that shows visible wear rather than waiting for it to fail mid-drive.
| Maintenance Task | Frequency | What to Look For |
|---|---|---|
| Inspect adhesive clips | Monthly | Lifting edges, clips that pop loose in heat |
| Check cable condition | Monthly | Fraying, kinks, exposed wire near the connector |
| Re-bundle spare cords | Quarterly | Tangles from cords being moved between vehicles |
| Clean the routing path | Quarterly | Dust and debris buildup under clips and trim |
Finally, reassess your setup when you change phones, mounts, or vehicles. A cable length that worked for a dashboard mount may not suit a vent mount, and a new car may offer better routing paths along its interior trim. Adapting your cord management system to your current setup keeps the cabin organized without constant fiddling.
Organizing phone cables in a car does not require a complicated system or expensive equipment. Choosing the right cable length, mapping a clean routing path, securing cords with heat-resistant clips, and protecting the stress points keeps your vehicle interior tidy and your devices charging reliably. CarNook Co. offers accessories designed for life on the move, from secure car phone mounts and MagSafe accessories to the CableGuard Charger Protector that extends the life of your cords. Explore the CarNook Co. collection and build a setup that keeps your car clean, your phone charged, and your drive clutter-free.
Frequently Asked Questions
How do I hide phone charging cable in car?
Route the cable behind the dashboard trim or center console panels. Use adhesive clips along the seam where the dashboard meets the trim to guide the cable from the power outlet to your phone mount. For a cleaner look, tuck excess cable slack into the console or under the floor mat. Avoid running cables across the steering wheel or gear shifter.
What are the best adhesive clips for car cable management?
Look for adhesive clips with strong adhesive tape, which holds up in hot car interiors. Metal clips with a rubber coating grip cables without pinching. Plastic clips work for lighter USB cables. Choose clips rated for high temperatures so they don't soften and fall off during summer. Position them on flat, clean surfaces for maximum adhesion.
How can I keep my charging cables from tangling in the center console?
Store only the cable length you need in the console. Bundle the excess using a velcro wrap or cable tie, leaving just enough slack to reach your phone. Alternatively, install a cable organizer with individual compartments inside the console. This keeps USB cables separated so they don't knot together when you close the lid or hit bumps.
Are magnetic cable organizers safe for car interiors?
Yes, magnetic organizers are safe as long as you keep them away from your phone's compass and any magnetic mounts you already use. The magnets are typically strong enough to hold cables but won't damage vehicle electronics. However, in hot weather, the adhesive backing can weaken. Choose organizers with heat-resistant adhesive rated for automotive use.
This article was written using GrandRanker