



Table of Contents
- Assess Your Center Console Space and Current Contents
- Declutter and Remove Items You Don't Need
- Compartmentalize and Categorize Your Essentials
- Best Car Organization Accessories for Console Storage
- Manage Charging Cables and Cord Tangle
- How to Organize Car Essentials for Travel
- DIY Divider Solutions for Custom Fit Storage
- Maximize Vertical Space and Awkward Areas
- Maintain Your Organized Center Console
- Frequently Asked Questions
Last Updated: September 27, 2026
Assess Your Center Console Space and Current Contents
A cluttered center console wastes valuable real estate and makes driving more stressful, which is why learning how to organize car center console space is so important. Before buying organizers or dividers, understand what the space actually holds and how much room exists to work with.
Measure Your Console Dimensions
Start by measuring the console's width, depth, and height. Use a tape measure to get exact numbers. Note any unusual shapes, angles, or obstacles like cup holders or armrest hinges that limit storage options.
Also measure the depth of compartments. Some consoles have shallow top surfaces but deeper storage underneath. Understanding the full vertical space helps identify opportunities for stacking or layered storage.
Take photos of the console from multiple angles. These images help when shopping for organizers or planning DIY solutions. They also serve as a reference if the console has unique features that require custom-fit storage.
Empty and Categorize Everything
Remove every item from the console. Wipe down the interior to see what you're working with. Sort items into clear categories:
- Daily essentials (keys, wallet, sunglasses)
- Charging cables and electronics
- Emergency supplies (tissues, hand sanitizer, first aid items)
- Vehicle documents and registration
- Coins and small change
- Items that don't belong (trash, forgotten items)
Laying everything out reveals what actually needs to stay in the console versus what belongs elsewhere.
Declutter and Remove Items You Don't Need
A smaller collection is easier to organize than a stuffed console. Be selective about what earns a spot.
Remove anything that hasn't been used in the past month. Expired receipts, old napkins, and forgotten wrappers take up space without adding value. Coins that have accumulated can go into a dedicated jar instead of rolling around.
Ask yourself: Does this item need to live in the center console, or would it be better stored in the glove box, trunk, or at home? Many people keep the console for daily essentials only. Everything else goes elsewhere.
Once the clutter is gone, the remaining items are easier to organize. The console feels more spacious, and finding what you need becomes faster.
Compartmentalize and Categorize Your Essentials
Grouping similar items together is key to how to organize car center console storage effectively and make it more functional. Each category gets its own space or container.
Create zones based on how often items are used. Daily essentials like keys and sunglasses go in the most accessible spot. Items needed less often can go deeper or in harder-to-reach areas.
Use the natural compartments of the console first. Cup holders can hold pens or small bottles. Existing dividers or trays organize coins and cards. Working with what's already there saves money and effort.
Label zones mentally or physically. Knowing that cables always go in one spot and emergency items in another makes the console predictable. Everyone in the household can find what they need without searching.
Best Car Organization Accessories for Console Storage
Aftermarket organizers transform a messy console into a functional storage system. The right accessories match the console's dimensions and hold items securely while driving.
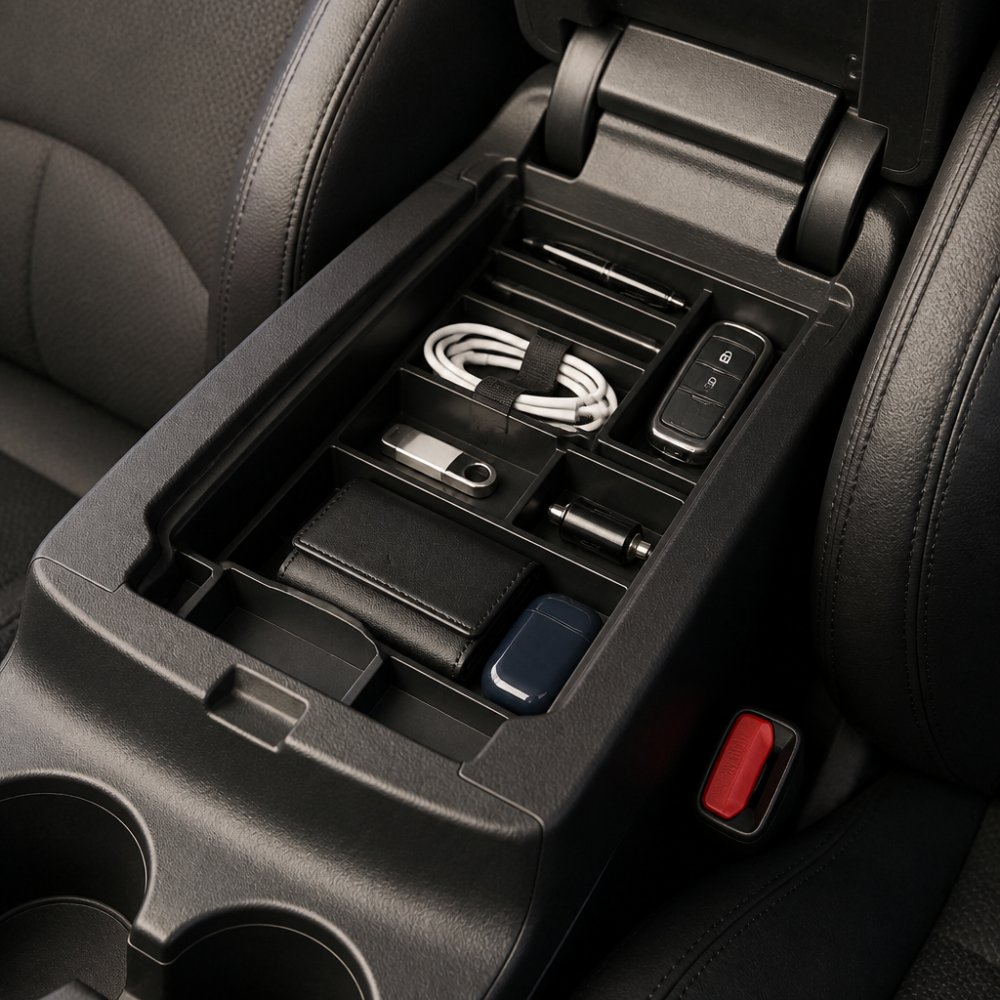
Storage Bins and Modular Inserts
Plastic storage bins fit into most consoles and create instant compartments. Small lidded bins keep items from shifting during turns or hard braking. Modular inserts stack vertically, maximizing space in deep consoles.
Look for bins with non-slip bottoms. They stay in place during acceleration and won't slide around when the vehicle stops suddenly. Clear bins let you see contents without opening them.
Modular systems offer flexibility. Start with a few inserts and add more as needed. Many systems work across different vehicle models, making them a smart investment if the console changes.
Non-Slip Mats and Trays
Non-slip mats prevent items from sliding during cornering or braking. A mat under loose items like sunglasses or keys keeps them in one spot. Trays with raised edges contain smaller items and prevent them from rolling into gaps.
Mats come in rubber or foam materials. Rubber holds items firmly and resists heat from the dashboard. Foam absorbs vibration and reduces noise from items shifting.
Trays with compartments organize coins, cards, and small electronics. They're especially useful for managing the awkward space that most consoles have.
Manage Charging Cables and Cord Tangle
Charging cables accumulate quickly in vehicles, and loose cables can create problems like tangling and distraction while driving. Understanding how to manage them helps you choose the right storage method.
Why Cables Tangle and Fail in Cars
Cables can tangle when stored loosely, and connectors can be damaged if cables are compressed or pinched.
Heat can be a factor in vehicles. High temperatures may affect cable insulation and performance.
Fabric-wrapped cables may offer some protection against heat compared to bare rubber. However, even these cables can benefit from airflow to prevent heat buildup.
Cable Organization Methods That Work
Velcro cable ties are the most practical option for vehicle storage. They secure cables without pinching insulation, and you can adjust them as needed. Look for ties with a soft loop side (the side touching the cable) to avoid snagging insulation. Avoid cheap plastic ties that can crack or cut into cable jackets.
Coiling technique matters. Wrap cables in loose, large loops (about 4-6 inches in diameter) rather than tight coils. Tight coils stress the internal wires and create kink points where insulation fails. Secure the coil with a single Velcro tie at the center, leaving the ends loose so the cable can expand and contract with temperature changes.
Dedicated cable pouches or organizers keep all cables in one container, which prevents them from spreading throughout the console and reduces heat exposure. A small fabric or silicone pouch with compartments lets you store multiple cables without tangling. Pouches with ventilation holes or mesh panels allow airflow, which is especially important in summer.
Clips and cable guides work well for frequently used cables (like a phone charger you plug in daily). Mount a clip on the console side or use adhesive cable guides to route the cable along the edge of the console rather than coiling it. This keeps the cable accessible and prevents it from being crushed under other items.
Label and Rotate Cables
Use small adhesive labels or cable tags to identify which charger fits which device. This prevents family members from using the wrong cable and reduces the time spent searching for the right connector.
Rotate cables seasonally if possible. In summer, store less-used cables in the trunk or at home to reduce heat exposure in the console. In winter, you can store more cables in the console since temperatures are lower.
Material Durability in High-Heat Environments
Not all cables are created equal for car storage. Cables with braided nylon jackets tend to last longer than bare rubber cables in vehicles because the outer layer provides a thermal buffer. Silicone-jacketed cables are also durable and flexible in heat, though they're less common and often more expensive.
Avoid storing cables directly against the dashboard or in direct sunlight if possible. Even inside a pouch, cables exposed to constant UV and heat age faster. If your console sits in bright sunlight, store temperature-sensitive cables (like those for wireless earbuds or smartwatches) in a shaded area or in the glove box instead.
Check cables every few months for signs of insulation damage, cracking, peeling, or discoloration. Replace damaged cables before they fail completely or create a safety hazard.
How to Organize Car Essentials for Travel
Road trips require different organization than daily commuting. Travel-specific organization ensures essentials stay accessible and protected throughout the journey.
Create Quick-Access Zones
Position frequently used items where the driver or passenger can reach them without taking eyes off the road. Sunglasses, tissues, and water bottles go in the most convenient spots.
Items needed at rest stops or destinations can go slightly deeper. Phone chargers, documents, and snacks fit in secondary zones. Emergency supplies go in the most protected area, accessible but not in the way.
Use the console's natural layout. Top surfaces work best for daily items. Deeper compartments suit items needed less often. Vertical storage in cup holders holds drinks and small supplies.
Pack an Emergency Kit
A small emergency kit belongs in every vehicle. Keep it organized in the console or in a dedicated pouch stored there. Include items like:
- First aid supplies
- Tissues and wet wipes
- Hand sanitizer
- Pain reliever
- Antacid
- Bandages and antibiotic ointment
Store the kit in a small container with a lid. It takes minimal space and provides peace of mind. Check it periodically to replace expired items or used supplies.
DIY Divider Solutions for Custom Fit Storage
Custom dividers work better than generic organizers for unusual console shapes, but only if they're measured correctly and made from materials that survive heat and vibration. This section walks you through the process of creating dividers that actually fit and last.
Measure Your Console for Custom Dividers
Accurate measurement is the foundation of any DIY divider project. A divider that's even a quarter-inch too wide won't fit; one that's too narrow will slide around.
Measure in three dimensions:
- Width, Measure from the left interior wall to the right interior wall at the top and bottom. Consoles often taper, so note if the width changes.
- Depth, Measure from the front edge to the back wall. Include any slope or angle in the measurement.
- Height, Measure from the bottom to the top, accounting for any cup holders, armrest hinges, or controls that protrude into the space.
Account for obstacles. Mark the exact location of cup holders, gear shift mechanisms, parking brake levers, and any other features that will interfere with dividers. Take photos from multiple angles and note these obstacles on your measurements.
Test fit before cutting. Use cardboard or kraft paper to create a template. Tape it into the console and test whether it interferes with the lid, armrest, or any moving parts. Adjust the template until it fits perfectly, then use it as a guide for cutting your final divider material.
Choose Materials That Withstand Heat and Vibration
Not all DIY materials perform equally in a car environment. Center consoles experience temperature swings, vibration from the engine and road, and occasional moisture from spills.
Foam board (rigid foam core) is lightweight and easy to cut, but it degrades in high heat. Foam can soften or warp if exposed to sustained temperatures above 120°F. It's best for temporary solutions or for consoles that stay relatively cool (like in vehicles parked in garages).
Rigid plastic sheets (like acrylic or polycarbonate) are more durable than foam. They resist heat up to 160-180°F depending on the type, and they don't absorb moisture. Acrylic is easier to cut and shape; polycarbonate is more impact-resistant. Both can be cut with a utility knife or saw, and edges can be smoothed with sandpaper.
Silicone or rubber dividers are flexible and grip the console walls without sliding. They absorb vibration better than rigid materials, which reduces noise from items shifting. Silicone resists heat and doesn't degrade in sunlight. The downside is that silicone dividers are harder to customize and often more expensive than other options.
Avoid thin cardboard or paper-based materials. They absorb moisture, compress under weight, and deteriorate quickly in a car environment. Cardboard tubes (like paper towel tubes) can work for vertical storage in a pouch, but they're not suitable as structural dividers.
Construction Methods for Different Divider Types
Rigid dividers (foam board or plastic sheets):
- Cut the material to your template dimensions using a utility knife (for foam) or a saw (for plastic).
- Sand or file the edges smooth to prevent snagging cables or damaging the console interior.
- Test fit the divider in the console without adhesive. Make sure it doesn't interfere with the lid, armrest, or any moving parts.
- If the divider fits snugly, you may not need adhesive. If it's loose, use removable adhesive strips (like 3M Command strips) on the back. Avoid permanent adhesive, which can damage the console if you need to remove the divider later.
- For multiple dividers, space them evenly and ensure they don't block access to controls or cup holders.
Flexible dividers (silicone or rubber):
- Measure and cut the material to size. Silicone can be cut with a utility knife or scissors.
- Insert the divider into the console and adjust it to fit snugly against the walls.
- Flexible dividers usually stay in place through friction; adhesive is rarely needed.
- Test that items placed against the divider don't shift during driving.
Vertical storage using tubes or containers:
- Measure the height and width of the space where you want vertical storage.
- Use paper towel tubes, wrapping paper tubes, or small containers (like PVC pipe cut to length) as vertical dividers.
- Arrange them in a grid pattern and secure them together with rubber bands or adhesive strips so they don't shift.
- This method works well for storing pens, small cables, or rolled documents.
Test for Interference and Safety
Before finalizing your dividers, test them under real driving conditions.
- Close the console lid to ensure dividers don't prevent it from closing fully or smoothly.
- Shift gears (if the console houses the gear shift) to confirm dividers don't interfere with the mechanism.
- Engage the parking brake to ensure dividers don't block the brake lever or pedal.
- Drive on bumpy roads to listen for rattling or shifting. If dividers move, add adhesive strips or adjust their fit.
Maintenance and Adjustments
DIY dividers may need adjustment over time. Adhesive strips can weaken in heat, and materials can shift with vibration.
- Check dividers monthly to ensure they're still secure.
- Replace adhesive strips if they lose grip.
- If a divider warps or cracks, replace it rather than trying to repair it.
- Adjust divider positions if your storage needs change.
Custom dividers are most effective when they're tailored to your specific console shape and driving habits. A divider that works perfectly for one vehicle may not fit another, so take time to measure and test before committing to a final design.
Maximize Vertical Space and Awkward Areas
Most consoles have vertical space that goes unused. Looking up instead of just forward reveals storage opportunities.
Stack items vertically using small containers or trays. Tall narrow bins fit in tight spaces. Vertical dividers create slots for flat items like documents or maps.
Cup holders often sit empty. Use them for pens, charging cables, or small bottles. They're already built-in storage that most people overlook.
Under-seat storage can extend the console's reach. Some vehicles have space under the front seats. Low-profile bins slide under seats and keep items accessible without taking up console real estate.
Awkward gaps between the console and door panels sometimes fit thin organizers. Measure these spaces carefully. A slim tray or pouch can capture storage in areas that would otherwise stay empty.
Maintain Your Organized Center Console
Organization requires ongoing effort. A system only works if it's maintained consistently.
Set a weekly maintenance routine. Spend five minutes clearing trash and returning items to their designated spots. This prevents clutter from accumulating and keeps the console functional.
Review what's stored every few months. Remove items that no longer serve a purpose. Add organizers if new items need homes. The console should evolve with changing needs.
Clean the interior regularly. Dust and debris settle in compartments. Wipe down trays and bins to keep them looking clean and functioning smoothly.
Involve everyone who uses the vehicle. When family members know where items belong, they're more likely to maintain the system. Clear communication about the organization method prevents frustration.
An organized center console makes every drive more pleasant. It reduces distractions, improves safety, and saves time searching for essentials. The process starts with assessment and decluttering, then builds with the right accessories and systems.
For drivers who want to extend organization beyond the console, CarNook Co. offers car phone mounts, travel accessories, and vehicle organization products that complement a well-organized interior. Explore the collection to find solutions that match the style and function of the space, turning the entire vehicle into a more organized and convenient environment.
Frequently Asked Questions
What should I keep in my car center console?
Store items you use regularly during drives: phone chargers, charging cables, sunglasses, registration documents, hand sanitizer, and a small emergency kit. Keep daily essentials within quick reach but avoid cluttering the space with items you rarely use. Consider your commute and travel habits when deciding what belongs in your console versus the glovebox or trunk.
How often should I clean out my car center console?
Aim to declutter your center console every 2-4 weeks, depending on how much you use your vehicle. A quick monthly sweep removes accumulated trash, loose change, and items that migrated from other areas. A deeper cleaning and reorganization every 3 months helps you reassess what you actually need and prevents the space from becoming a catch-all for unnecessary items.
What are some simple DIY hacks for car interior organization?
Use plastic photo boxes or small lidded bins to compartmentalize items by category. Add a non-slip mat to prevent containers from sliding during turns. Install cable organizers or use velcro straps to manage charging cords and keep them tangle-free. Repurpose drawer dividers or foam inserts to create custom compartments that fit your console's exact dimensions for maximum space optimization.
How do I maximize space in a small center console?
Use vertical space by stacking slim bins or utilizing the height of your console. Choose modular inserts that fit your specific console dimensions for a custom fit. Remove items you don't need regularly and consider storing backup supplies in your trunk or glovebox instead. Opt for compact, dual-purpose accessories like phone stands that also hold small items to reduce clutter.