


⚡ Free Express Shipping in USA✦
🔥 Newest Arrival Collection Live Now✦
✨ SUBSCRIBE TO GET YOUR 10% Off✦

Last Updated: October 31, 2026
Quick Summary
To install a cup holder phone mount securely, set the expansion base into the cup holder and twist it until it grips the walls firmly, then attach the arm and cradle and tighten the ball joint. Test for wobble before driving, and re-seat the base or tighten the joint if anything shifts.
A cup holder phone mount is a simple accessory that can make or break your daily drive. Installed correctly, it keeps your phone steady for navigation and hands-free calls. Installed poorly, it wobbles, slips, or tips over at the worst moment.
That distinction matters more than most drivers expect. A secure result depends on proper setup as much as on the mount itself. In other words, the mount is only half the equation. The install is the other half.
Below, this CarNook Co. guide walks through a model-agnostic installation sequence that works for most twist-lock and expansion-base designs. You'll see how to check fit before you buy, tighten the base so it grips, set the arm and cradle, and test stability before you pull out of the driveway.
A quick stability check before you drive can help you avoid a surprise on the road.
Compatibility comes down to two things: the cup holder itself and the phone you're mounting. Get both right and installation becomes straightforward. Get either wrong and no amount of tightening will fix a loose fit.
Cup holders vary widely in diameter, depth, and shape. Some are round and deep. Others are shallow, squared off, or split by a divider. A few sit at an angle inside the console.
Before buying, look at the holder you plan to use:
A twist-lock expansion base works by pressing outward against the holder walls. The more consistent the wall surface, the more even the grip. If your holder has a divider or an odd shape, test the mount in that exact spot before you commit.
Phone size and case thickness affect how well a cradle or clamp holds your device. A bulky case can make a snug cradle feel tight, while a slim case may slide in a wider one.
Here's a quick way to think about it:
| Your Setup | What to Check |
|---|---|
| Large or heavy phone | Cradle width and arm stiffness |
| Thick protective case | Clamp opening and grip depth |
| Thin or bare phone | Cradle padding and side grip |
| Magnetic-compatible case | Whether the case supports magnetic mounting |
If you use a magnetic mount, confirm your case works with it. A case that's too thick or lacks magnetic alignment can weaken the hold. For a step-by-step check, see how to tell if your phone case is MagSafe compatible. And if your device is on the larger side, the guidance in best car mount for heavy phones helps you pick a mount built for the weight.
Installation follows a clear order: set the base first, then the arm, then the cradle, then the angle. Doing it in that sequence keeps each part stable before you add the next. The sequence below is model-agnostic, it covers the common twist-lock and expansion-base designs, so you can follow it before you know exactly which mount you have.
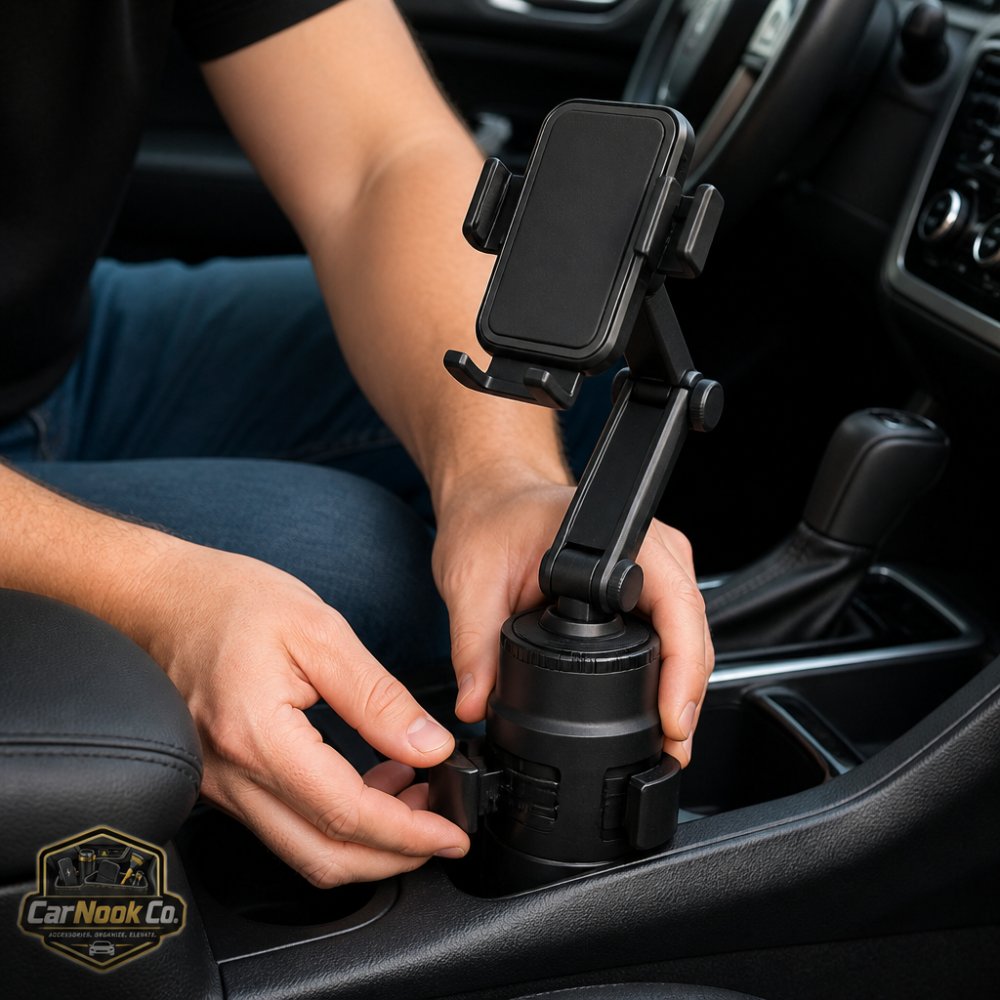
Lay out the parts and match them to the instructions. Most cup holder mounts include three main pieces:
Check that the ball joint, socket, and any plastic ring or locking nut are present. Loose parts left in the box are a common reason a mount feels unstable later. If your mount uses a separate rubber sleeve or sizing collar for the base, set it aside where you can reach it, you may need it in Step 2.
This is the step that decides whether your mount stays put. Set the base into the cup holder, then turn it to expand the mechanism against the walls. Per The Mighty Mount's installation guidance, the base should be turned until it expands snugly inside the holder.
How the grip actually works: most expansion bases use a threaded collar or a cam that pushes rubber or plastic feet outward as you twist. The feet press against the cup holder walls, and friction between those feet and the walls is what holds the mount. That means grip depends on contact area and wall texture, not on how hard you crank the collar.
A few things to watch:
If the base spins instead of locking: the feet aren't reaching the walls. Try these in order:
Screw or clip the arm onto the base, then attach the cradle to the arm. Tighten the locking ring or nut around the ball joint so the arm holds its position.
Now set your viewing angle:
Aim for a position where you can glance at the screen without turning your head far from the road. If your arm has a telescoping section, extend it only as far as you need, a longer arm puts more leverage on the ball joint and can make the mount feel looser than it is.
With the mount assembled, attach your phone and check the cradle. Side-grip clamps should contact the phone on both sides with the padding flat against the edges, not pinching a button or a camera bump. If the cradle feels tight with your case on, don't force it, check whether the clamp has an adjustable width or a wider setting. A cradle that's too tight can make the phone hard to remove one-handed, which matters every time you get in and out.
Once the phone is seated, move on to the stability test before you drive. A mount that feels tight in your hand can still shift once the vehicle is moving, so a parked check can help catch some of those problems early.
Wobble often traces back to one of three sources: a loose base, a loose joint, or an overloaded arm. Work through them in that order. Matching the symptom to the source before you start tightening helps you avoid working on the wrong part.
Before you touch anything, watch how the mount moves:
| What You See | Likely Source | First Fix |
|---|---|---|
| Whole mount rocks or rotates in the cup holder | Base not gripping the walls | Re-seat and re-expand the base |
| Arm droops or the angle drifts over bumps | Ball joint or locking ring loose | Tighten the joint ring |
| Cradle tips forward under the phone's weight | Arm too long or joint overloaded | Shorten the arm or move the cradle closer |
| Phone shifts inside the cradle | Clamp width or padding mismatch | Adjust clamp width or check case fit |
| Base holds but the whole assembly buzzes at speed | Contact area too small for the holder | Try a different cup holder or add a sizing sleeve |
Wobble often comes from the first two rows. Start there.
CarNook™ Wireless Charging Phone Holder →
Re-seat it and turn the expansion mechanism again. If the cup holder walls are smooth or the holder is shallow, the base may need a firmer turn or a different cup holder altogether.
Fit-specific fixes:
Check the ball joint and locking ring. These loosen over time with vibration. A quick tighten often restores a firm hold.
If the joint keeps loosening, look at the locking ring itself. Some designs use a split ring that compresses around the ball; if the ring is cracked or the threads are worn, tightening won't hold and the part may need replacing. Clean any dust or grit off the ball before you tighten, grit between the ball and socket can keep the joint from seating.
A heavy phone on a long arm puts more use on the joint. Shortening the arm or moving the cradle closer to the base can reduce that strain. If your arm is fixed-length, check whether the cradle can be mounted closer to the base on the same joint.
If the mount still wobbles after those checks, the problem may be a mismatch between the mount and the holder rather than a loose part. A base designed for deep, round holders may never grip a shallow, divided one, no matter how carefully you tighten it. In that case, the fix is a different mount or a different cup holder, not more force. For additional stabilization ideas, see how to keep car phone mount secure.
Placement affects both safety and how easy the mount is to use. Choosing a cup holder near the driver's natural line of sight helps keep a glance at the screen from pulling your eyes far from the road.
Use these placement checks:
A cup holder mount has one built-in advantage here: it sits low and out of the windshield view, which many drivers prefer for a clean interior. The trade-off is that you'll look slightly down to see the screen, so angle the cradle upward toward your eyes.
Test the mount before you rely on it. A simple parked check catches most problems.
Try this sequence:
If the mount holds through all five steps, it may be ready for normal driving. If it moves, fix it now rather than on the road.
Test with the phone you'll actually use, in the case you'll actually keep on it, since real-world hold can depend on those details.
A secure mount and a reliable charge go together, especially on longer drives. Plan the cable before you finalize the angle.
Keep these points in mind:
For drivers who want charging built into the mount, the CarNook™ Wireless Charging Phone Holder combines a strong suction-cup mounting base with automatic clamping and Qi wireless charging, depending on your compatible device and power source.

Removing the mount takes the same care as installing it. Turn the base to release the expansion, then lift it out gently.
A few habits keep both the mount and your console in good shape:
Leaving a mount in place for long periods in direct sun may affect some plastic parts, so checking the fit before a long trip is a good habit.
The right mount matches your cup holder, your phone, and how you drive. Get those three aligned and installation becomes a five-minute task instead of a recurring frustration.
Here's a simple decision guide:
For a broader comparison of mount types and features, the buyer's guide to choosing a phone mount walks through the trade-offs. CarNook Co. offers car phone mounts, MagSafe-compatible accessories, phone cases, and travel accessories for everyday use.
Start by separating the base, arm, and cradle if your mount ships in pieces. Set the expansion base into the cup holder and turn it to expand and tighten against the sides. Attach the holder to the mounting arm, adjust the ball joint to your viewing angle, then press the phone into the cradle or attach it magnetically. Before driving, push and pull the mount gently to confirm it holds. Follow the manufacturer's instructions for any model-specific steps.
Not always. Cup holder phone mount compatibility depends on the size and shape of your cup holder and the design of the mount's base. Some consoles have shallow, angled, or unusually shaped holders that expansion bases may not grip well. Check the mount's listed fit range against your cup holder before buying, and look for a base that expands to match. If your cup holder is oversized or irregular, a different mount type may suit your vehicle better.
Tight enough that the base does not rotate or lift when you push the phone into the cradle, but not so tight that you force the mechanism. Turn the base until it feels snug against the cup holder walls, then test with a gentle push and pull. If the mount still shifts, remove it, check that the base is seated evenly, and tighten again. Over-tightening can stress the base or the cup holder, so stop when it feels firm.
Give the mount a firm but gentle push and pull before you drive. It should not rotate, tilt, or lift out of the cup holder. Press the phone into the holder and check that it stays put without sagging. Then check your view: the phone should sit within easy glance range without blocking the windshield or controls. If anything shifts during the test, reseat and tighten the base before you hit the road.
A wobbly mount is a small problem with an outsized effect on every drive. The fix starts with the right base, a firm twist, and a two-minute stability test before you hit the road. CarNook Co. builds practical accessories for exactly this kind of everyday setup, including secure car mounts, MagSafe-compatible options, and protective phone cases that work with the gear you already own. Explore the CarNook Co. collection and get your phone mounted, charged, and steady before your next trip.


